

Calendar Basics
Everything you need to know about creating, managing, and participating in calendar events on My PowerPak.
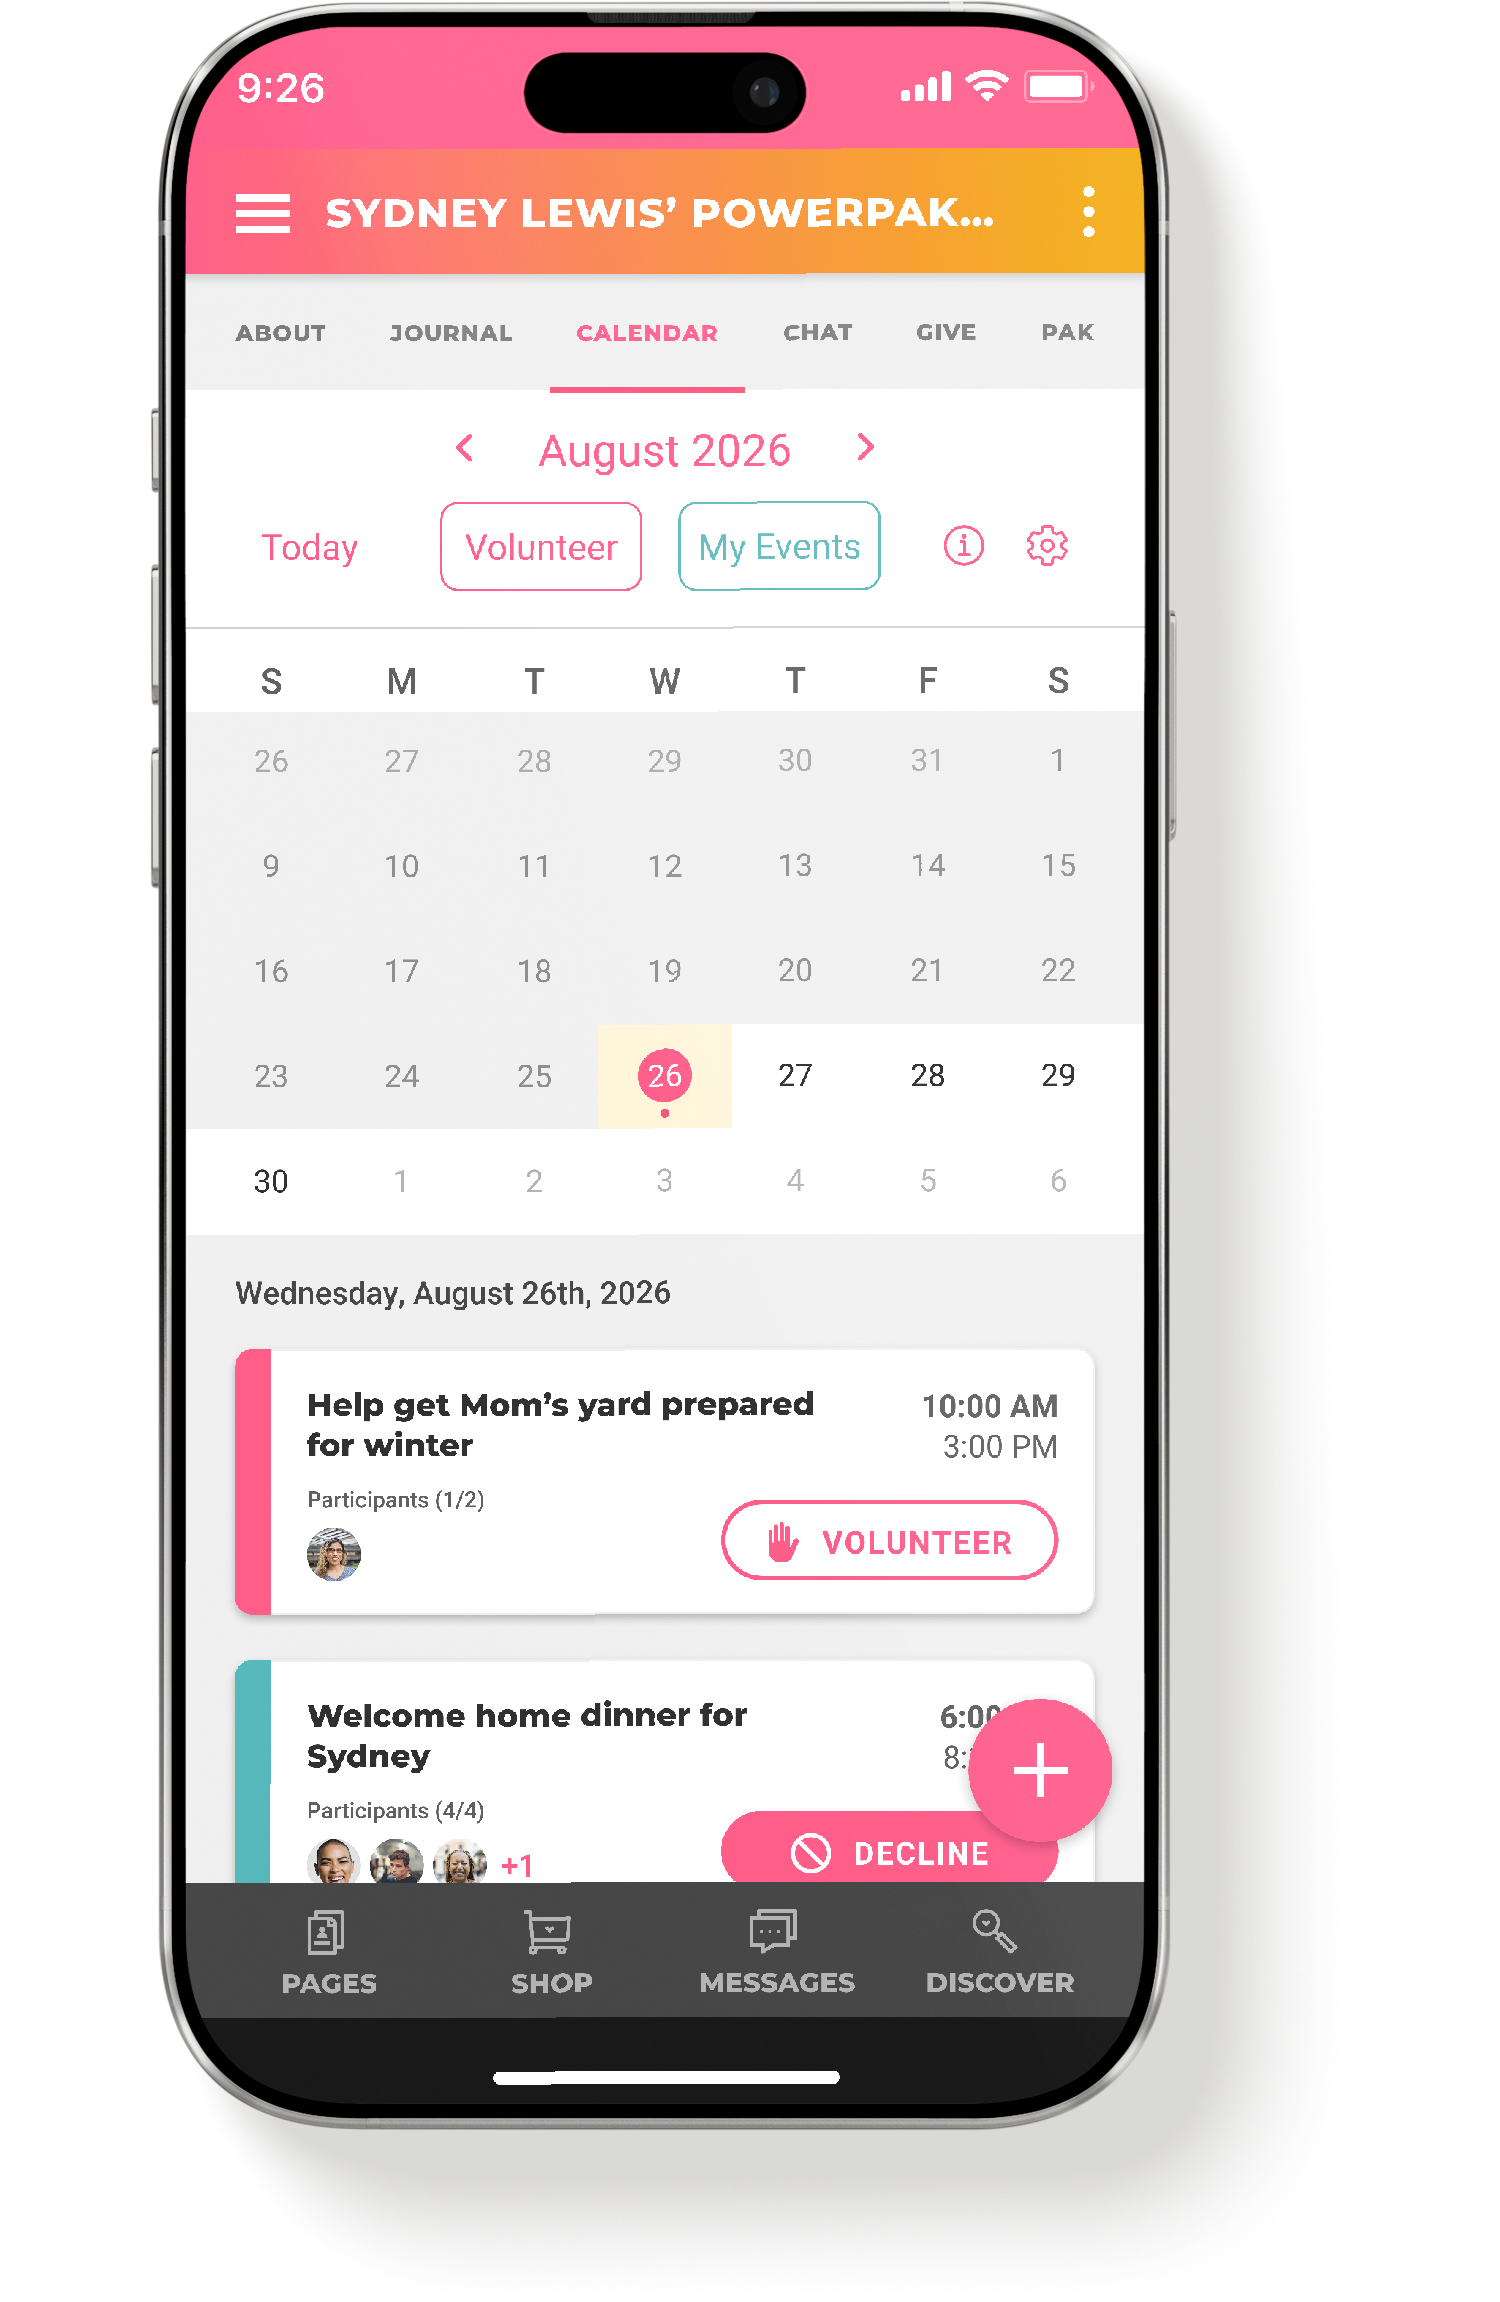
Calendar at a Glance
The calendar lives inside each PowerPak Page. Tap the Calendar tab in the page navigation to open it.
At the top of the screen you'll find a full month grid — the mini-calendar. Tap any date to jump to it; the agenda view below updates to show events for that day. Use the < and > arrows to move between months, or tap Today to return to the current date.
Below the mini-calendar, the agenda view lists the events for your selected date as cards. Each card shows the event title, time, participant thumbnails, and the Volunteer or Decline button if it applies to you. Tapping the agenda card brings you to the full event details.
To create a new event, tap the + button in the bottom-right corner of the screen.
-
Each date that has events shows a color-coded dot beneath it. Tap the ⓘ icon to see the legend:
Pink dot — the event needs volunteers and the quota hasn't been met yet
Blue dot — volunteers were requested and the quota has been filled
Gray dot — no volunteers were requested for this event
The colored edge of the agenda cards also allows you to spot volunteer status at a glance.
The yellow highlighted cells correspond with events that still need volunteers. If there is more than one event on a single day, the colored dot appearance prioritizes events that still need volunteers.
-
Two controls sit above the mini-calendar to help you filter what you see:
Volunteer — shows only events that still need volunteers
My Events — shows only events you are organizing, volunteering for, or have been added to as a Guest
Event Titles
When creating an event, the Event Title field is a dropdown pre-loaded with common caregiving event types — things like Medical Appointment, Ride To Appointment, Delivering A Meal, and Grocery Shopping — so you can select a title without typing it out each time.
If none of the presets fit, choose Custom to enter your own title in the text field that appears.
You can manage your preset list at any time by tapping the ⚙ settings icon in the top-right area of the calendar overview screen. From there you can view your current presets, remove ones you don't use, and add new ones. Presets store the title only — they don't carry over any event settings like date, time, or participants. Keep in mind that any changes you make to the preset list are shared across all admins of that PowerPak Page.
Event Types
Every calendar event is one of two types: a Single Event or a Recurring Event.
Single Event is the default. Use it for anything that happens once — including events that span more than one day. A Single Event can start on one date and end on another, up to 30 days apart. All instances of a day-spanning event link back to the same event record, so tapping any day's card opens the same details screen.
Recurring Event repeats on a schedule you define. When you select this type, two additional settings appear:
Repeat every — set a number and a frequency (Day, Week, Month, etc.) to control how often the event recurs
Ends — choose when the series stops: in 1 year (the default), on a specific date, or after a set number of occurrences
Recurring events share a single comment thread across all instances. Guests added to a recurring event are included in every occurrence of the series.
Scheduling Events
The When field handles date and time in a single input. Tapping it opens a range picker where you set a start date and time and an end date and time. The default event duration is set to 1 hour and the minutes selection is set to 5-minute increments. When you're done, tap Set to confirm.
If your event runs all day, check All Day Event and the time selectors disappear — leaving just a start date and end date.
Two optional fields round out the event details:
Place — a free-text field for the event location.
Notes — a free-text field for any additional context or instructions.
Community Settings
The Community Settings section of event creation is where you control who can see your event and who is involved in it. Three settings live here — Visibility, Request Volunteers, and Add Guests — and your Visibility selection determines which of the other two are available.
-
Visibility determines who can see and interact with your event. The default is PowerPak (Public). Tap the Visibility field to choose from three options:
PowerPak (Public) — the event is visible to all members of your PowerPak Page. Both Request Volunteers and Add Guests are available.
Guests Only — the event is visible only to the specific members you add as Guests. Request Volunteers is not available for this setting.
Private (Only You) — the event is visible only to you. Neither Request Volunteers nor Add Guests is available.
You can change the visibility when editing an event, and the event details screen always reflects the current setting.
-
Request Volunteers is only available when Visibility is set to PowerPak (Public). Check Request Volunteers to put out an open call to your PowerPak Page for help with an event. When you save the event, all Pak members are notified that volunteers are needed.
When this checkbox is checked, a How Many? field appears where you enter the number of volunteers you need. The minimum is 1. The combined total of volunteers requested plus Guests added cannot exceed 15 or the total number of registered Pak members, whichever is lower.
Members opt in by tapping the Volunteer button on the event's agenda card or details screen.
-
Check Add Guests to manually add specific Pak members to the event. Unlike volunteering, Guests don't opt in — they're added directly, and they're notified as soon as the event is saved.
Tap Add to open the member selection screen, where Pak members are organized by role. Select the members you want to include and tap Save Selection to confirm.
A few things to keep in mind about Guests:
Guests added to a recurring event are included in every occurrence of the series.
If you set Visibility to Guests Only, only the members you add here will be able to see the event.
If a Guest declines a Guests Only event, the event is no longer visible to them. If a Guest declined the event by mistake, the Organizer will need to edit the event and re-add them to it.
The combined total of Guests added plus volunteers requested cannot exceed 15 or the total number of registered Pak members, whichever is lower.
Participants
Anyone actively involved in an event appears in the Participants list. A Participant is anyone who has volunteered for the event or been added as a Guest.
Note: The Organizer must add themselves as a Guest or volunteer for their event in order to appear in the Participants list.
-
The counter next to the Participants label shows how many people are involved, and sometimes how many are still needed:
One number (e.g. Participants (3)) — only Guests were added, no volunteers were requested. The number is the total count of Guests.
Two numbers (e.g. Participants (2/5)) — volunteers were requested. The first number is the current participant count; the second is the total slots (volunteers requested + Guests added). When the two numbers differ, it means the volunteer quota hasn't been filled yet.
-
Each person in the Participants list is labeled by their role:
Organizer — the member who created the event (only appears in the Participants list if they've added themselves as a guest or volunteered)
Volunteer — a member who opted in by tapping the Volunteer button
Guest — a member who was manually added by the Organizer
If the Organizer is participating in the event, they will appear first in the list, followed by Volunteers and Guests in alphabetical order.
-
The toggle button on the agenda card and event details screen reflects your current status.
Enabled states
Volunteer (outlined) — you haven't joined yet; tap to volunteer
Decline (filled pink) — you're currently participating; tap to withdraw
Guests see the button in the Decline state by default, since they've already been added.
Disabled states
The button becomes disabled and cannot be tapped in two situations:
Volunteer quota met — the number of volunteers needed has been filled; the button remains in the Volunteer state but appears disabled
Event started or historical — once the event's start time has passed, the button is disabled for all users, as volunteering or declining after the fact isn't useful for the Organizer or other Participants
Event Details Screen
Tapping an event card opens the event details screen. Here's what you'll find:
Event title and PowerPak Page appear at the top, followed by the full Date & Time range including timezone.
Add to Calendar button — tap this to export the event to an external calendar. Options include Google, Office 365, Outlook, Outlook.com, and Yahoo.
Note: If you're viewing a recurring event, only the specific instance you're looking at will be exported — not the full series. Exported events are not synced, so any changes made to the event in My PowerPak will need to be re-exported.

Summary block — a quick-reference panel that shows four key details at a glance:
Organized by [Name]
Visibility setting (e.g. Visible to all PowerPak Page members)
Event type (Single Event or Recurring Event)
Volunteer status (No volunteers needed / Volunteers needed / Volunteers filled)
Volunteer / Decline button — your participation toggle. See the Participants section above for how the button states work.
Participants list — shows everyone involved in the event with their role label.
Place and Notes — appear above the summary block if the Organizer entered them during creation.
Comments — the comment thread lives at the bottom of the screen. See the Event Comments section below for more info.
Ellipsis menu (⋮) — visible to the Organizer only, in the top-right corner of the screen. Tap it to access Edit and Delete options.
Event Comments
The comments section at the bottom of the event details screen lets Organizers and Participants communicate directly within the context of the event.
Note: Recurring events share a single comment thread across all instances — comments posted on any occurrence appear on all of them.
Who can comment: The Organizer and anyone in the Participants list (Volunteers and Guests) can post comments.
Who can view the thread: This follows the event's visibility setting. On a PowerPak (Public) event, all Pak members can read the comments and react to them. On a Guests Only event, only Guests can see the thread. On a Private event, only the Organizer can see it.
Character limit: Comments can be up to 3,000 characters. A live counter (shown as X / 3000) increments as you type.
Reactions: Long press (mobile) or hover (desktop) Like beneath any comment to open the reaction picker and choose from seven emoji reactions: ❤️ 🤗 💪 😂 👏 🙌 😢.
Notifications
The calendar keeps Organizers and Participants informed automatically. Here's a summary of calendar related actions that trigger notifications:
Volunteers needed — when a public event is created or edited to request volunteers, all Pak members are notified
Added as a Guest — when an Organizer adds you to an event, you receive a notification
New comment — when someone posts a comment on an event, all Participants and the Organizer are notified (excluding the person who posted)
Event cancelled — when an Organizer deletes an event, all current Volunteers and Guests are notified
Volunteer activity — Organizers are notified when someone volunteers for their event or when a Volunteer or Guest declines
Notifications appear as push notifications on your device and as items in your Notifications Feed inside the app — even if you have push notifications turned off, the feed keeps a running record of activity.
Frequently Asked Questions
-
They're both ways to involve specific people in an event, but the intent is different. Requesting Volunteers is an open call — any Pak member can opt in by tapping the Volunteer button. Adding Guests is a direct invite — the Organizer chooses exactly who is included, and those members are added automatically without needing to opt in. You can use one, the other, or both on the same event.
-
Volunteers are notified through a broadcast to all Pak members, so requesting them only makes sense when the event is visible to everyone. If you switch to Guests Only or Private, the Request Volunteers checkbox is hidden because there's no one to volunteer — the event isn't visible to the broader Pak.
-
If a Guest declines participation on a Guests Only event, they lose access to the event entirely — it will no longer appear on their calendar. The only way back in is for the Organizer to edit the event and re-add them as a Guest. If the event includes both Guests and Volunteers, and there are still volunteer slots available, the declined Guest could optionally volunteer for the event to regain access.
-
The counter shows two numbers (e.g. Participants 2/5) when volunteers have been requested, because the second number represents the total slots available. The gap between the two tells you how many volunteer spots are still open. When no volunteers were requested — only Guests were added — there's no quota to track, so just a single count is shown (e.g. Participants 3).
-
Organizers aren't automatically added as Participants because not every Organizer is actively taking part in the event — sometimes they're just coordinating. An Organizer only appears in the Participants list if they've added themselves as a Guest or voluntarily tapped the Volunteer button on their own event.
-
No — all instances of a recurring event share a single comment thread. A comment posted while viewing any occurrence will appear when viewing any other occurrence of the same event.
-
Not a bug — it's a current limitation. The Add to Calendar export only captures the specific instance you were viewing when you tapped the button. If you need multiple dates in your external calendar, you'll need to export each occurrence individually for now.
Still Have Questions?
We're here to help. Use the form below to reach our support team and we'll get back to you within 24 hours (response times may be longer on weekends).
Last Updated 9/23/2026 | We're actively improving the calendar feature and this content is updated regularly. Some details may not yet reflect the latest changes.